
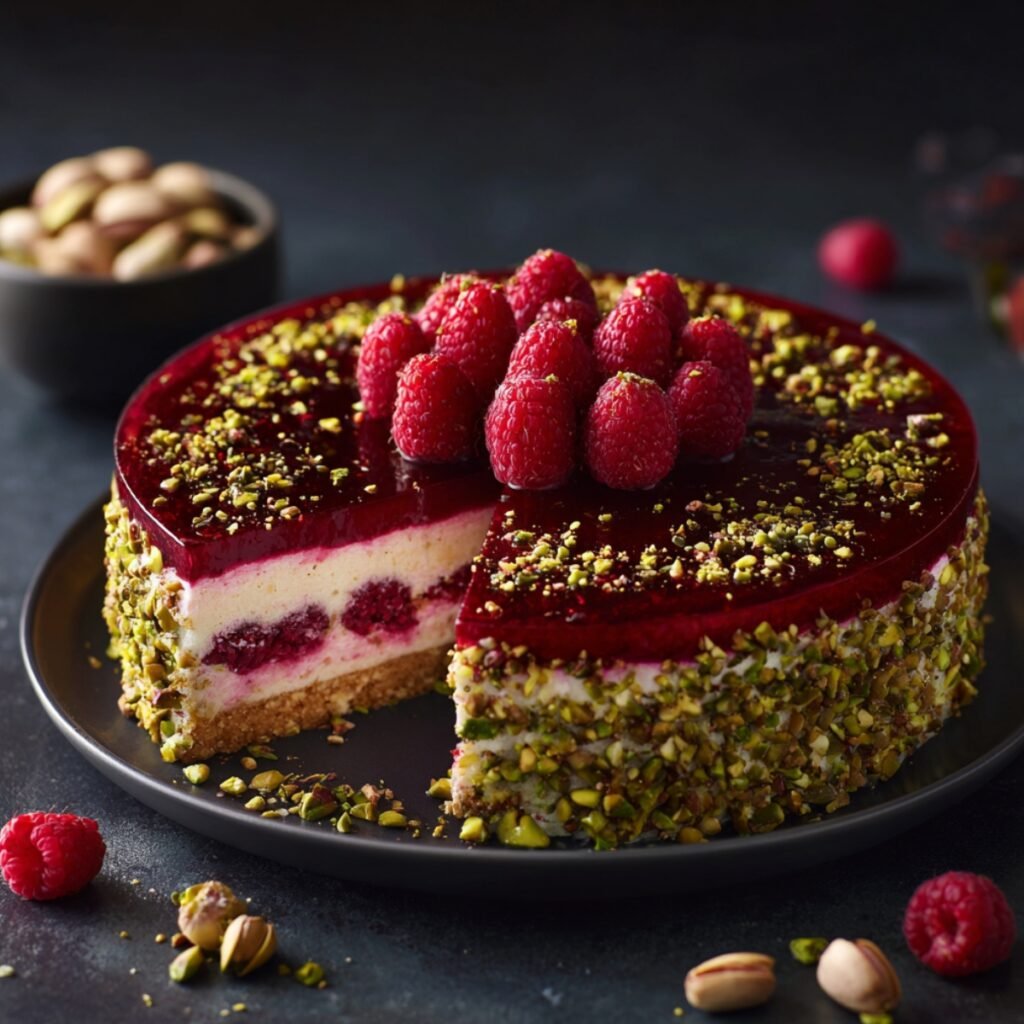
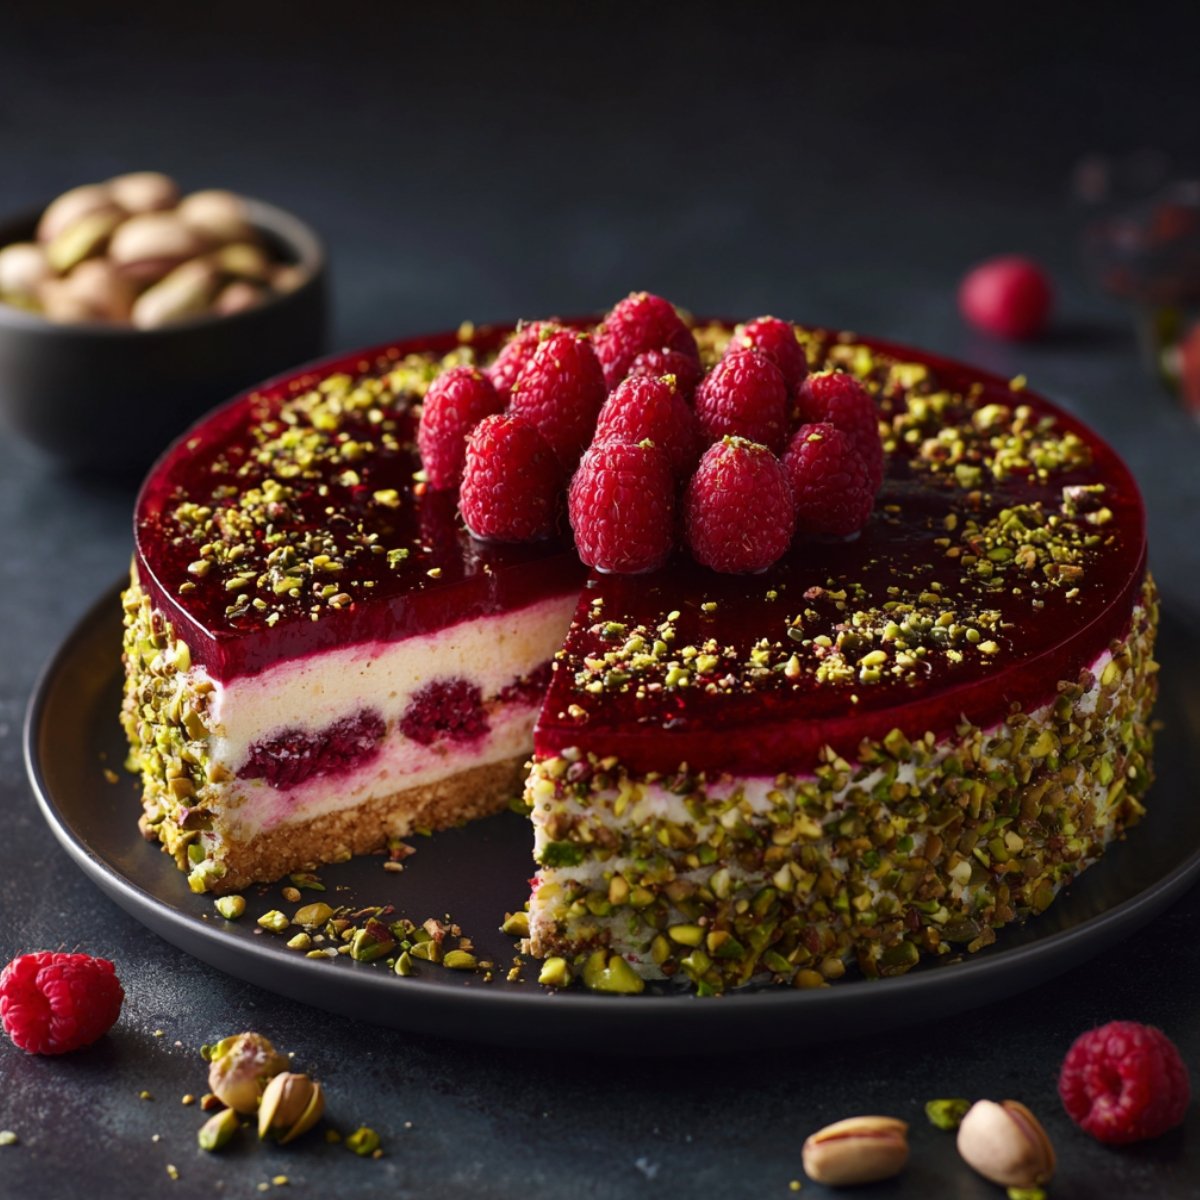
Anna stood at the counter looking at the slice on the dark plate and said nothing for a full ten seconds, which is unusual for someone who normally narrates every step of dessert assembly. The pistachio crust ran up the sides of the slice in a crumbled green and brown border, the cream cheese filling was pale and smooth in the cross-section, and the raspberry layer sat between them in a deep pink band before giving way to the glossy dark red jelly on top piled with whole fresh raspberries. She finally said it looked like something from a competition, and then she picked up the gold fork. Pistachio Raspberry Crunch Cheesecake is the dessert that earns that silence.
Jump to:
- Why You Will Love This Pistachio Raspberry Crunch Cheesecake
- How To Make a Pistachio Raspberry Crunch Cheesecake
- Main Ingredients
- Step by Step Instructions
- Pistachio Raspberry Crunch Cheesecake Variations
- Substitutions
- Equipment
- Storage Tips
- My Grandma's Secret Worth Sharing
- FAQs
- Four Layers and One Gold Fork
- Related
- Pistachio Raspberry Crunch Cheesecake
Why You Will Love This Pistachio Raspberry Crunch Cheesecake
This cheesecake delivers four distinct experiences in a single slice and that is why it earns a place at any table that calls for something genuinely special. The pistachio crust pressed up the sides gives each slice a crunch that contrasts with the smooth, cool cream cheese filling beneath it. The raspberry layer folded through the lower portion of the filling adds a fruity, slightly tart streak that keeps the richness of the cream cheese from tasting one-dimensional. The glossy raspberry jelly on top sets to a firm, jewel-like surface, and the fresh raspberries piled above it bring the whole dessert together in the way that a fruit-forward topping on a rich base always does. Anna asked if we could make it for a birthday instead of a cake, and the answer was immediately yes.
How To Make a Pistachio Raspberry Crunch Cheesecake
The first time I made this, I pressed the pistachio crust only into the base of the tin and not up the sides, and the finished slice looked like a normal cheesecake when it was cut and plated. It tasted right but it did not look like the image. Anna noticed immediately and said the sides were supposed to be green and crunchy, which was a precise and accurate observation. The second attempt I pressed the crust mixture firmly up the sides of the springform pan to a height of 3 cm before chilling, and after the filling was added and the whole thing chilled overnight, each slice came out with the green and brown pistachio border clearly visible along the full edge of the slice exactly the way the image shows. That one additional step, pressing the sides, is the entire visual difference between a good cheesecake and this cheesecake.
Main Ingredients
For the Pistachio Crunch Crust:
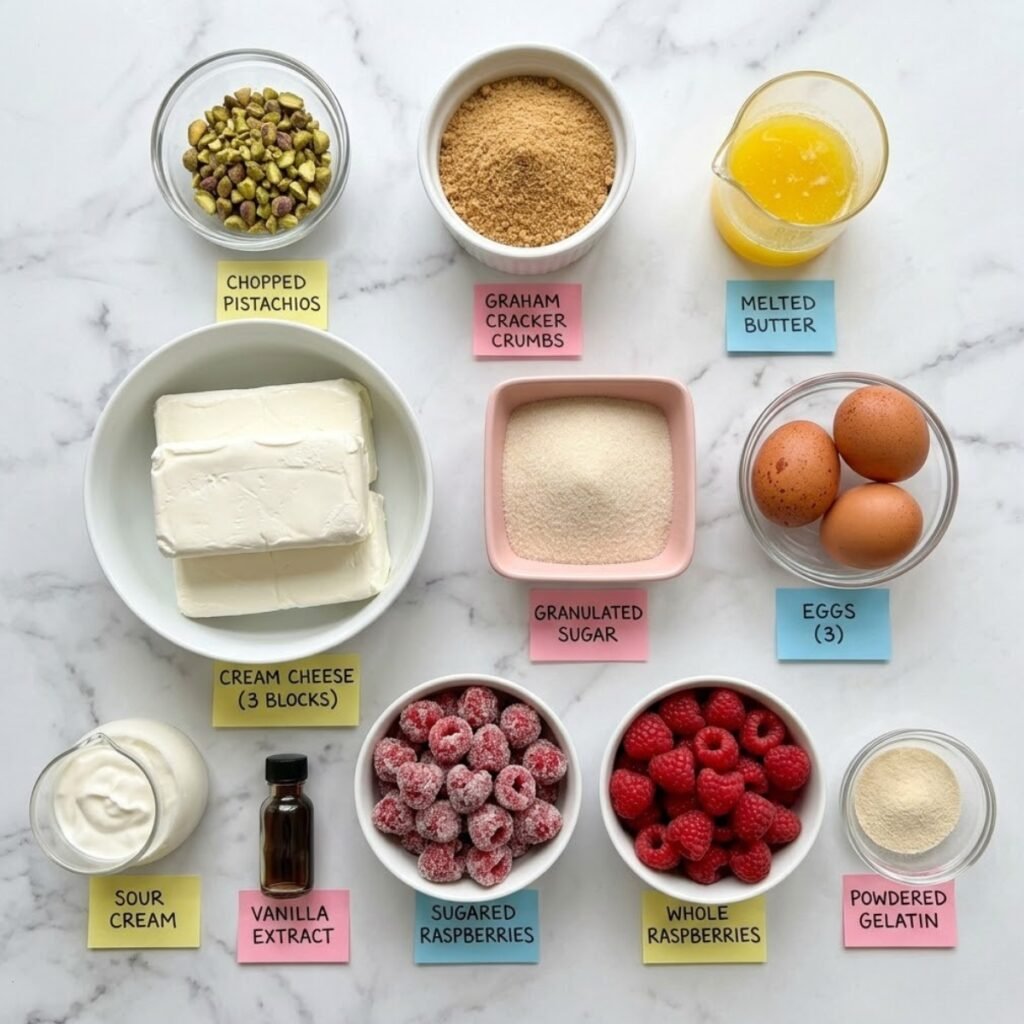
- 1 and ½ cups (200g) shelled unsalted pistachios, roughly chopped (the primary crust ingredient and the signature visual element of the sides of the slice; roughly chopped rather than ground fine so the crust retains visible green pistachio pieces and actual crunch rather than being a smooth paste base)
- ½ cup (60g) graham cracker crumbs or digestive biscuit crumbs (the binder that holds the pistachio pieces together into a crust that presses cleanly and holds its shape when the filling is added)
- 3 tablespoons granulated sugar (sweetens the crust and draws out the natural nuttiness of the pistachios when they are pressed against the filling during chilling)
- 5 tablespoons unsalted butter, melted (the fat that binds the pistachio and crumb mixture; press firmly enough that the crust holds a clean pressed edge when you run your finger along it) For the Cream Cheese Filling:
- 24 oz (680g) full-fat cream cheese, room temperature (three full blocks; room temperature is non-negotiable for a lump-free filling that beats smooth in under 3 minutes)
- ¾ cup (150g) granulated sugar (sweetens the filling to the point where it balances the tart raspberry layer without tasting cloying against it)
- 3 large eggs, room temperature (the structure agents; low-speed beating only until just combined prevents excess air that causes cracking)
- 1 teaspoon vanilla extract (adds warmth that prevents the cream cheese from tasting flat in the baked result)
- ¼ cup (60ml) sour cream (keeps the filling creamy and smooth rather than dense after the bake and the overnight chill) For the Raspberry Layer:
- 1 cup (120g) fresh or frozen raspberries (folded gently through the lower third of the cheesecake filling before baking so the raspberry streaks and pockets visible in the cross-section of the slice develop naturally during the bake rather than being a separate poured layer)
- 2 tablespoons granulated sugar (tossed with the raspberries before folding so they release a small amount of juice that stains the filling pink in the band visible between the white filling and the jelly topping) For the Raspberry Jelly Topping:
- 1 and ½ cups (180g) fresh raspberries (cooked down into the glaze base)
- 3 tablespoons granulated sugar (adjust based on raspberry tartness)
- 1 tablespoon lemon juice (fixes the color and lifts the flavor of the glaze)
- 1 teaspoon powdered gelatin bloomed in 2 tablespoons cold water (sets the glaze to the firm, glossy, sliceable layer visible in the image that does not run when the slice is lifted and plated) For Finishing:
- ½ cup (65g) shelled pistachios, roughly chopped (scattered over the set jelly topping and around the base of the slice as visible in the image; the contrast of the green nuts against the dark red glaze is the finishing detail that makes the dessert look composed)
- 1 cup fresh whole raspberries (piled on top of the set jelly layer in the center and slightly off-center as shown in the image so they look generously piled rather than placed one by one)
Step by Step Instructions
Step 1: Make the Pistachio Crust and Chill
- Preheat the oven to 325°F (165°C) and grease a 9-inch springform pan generously with butter on both the base and the sides; line the base with a circle of parchment paper cut to fit exactly so the baked cheesecake lifts cleanly from the tin without sticking.
- Pulse the shelled pistachios in a food processor 4 to 5 times until roughly chopped into irregular pieces between 3 and 5mm; do not process further into a fine powder because the larger pieces are what create the visible crunch and the green color in the crust that is the defining visual of this cheesecake.
- Combine the chopped pistachios, graham cracker crumbs, and sugar in a bowl, add the melted butter, and stir until every piece is coated and the mixture holds together when pressed firmly between two fingers.
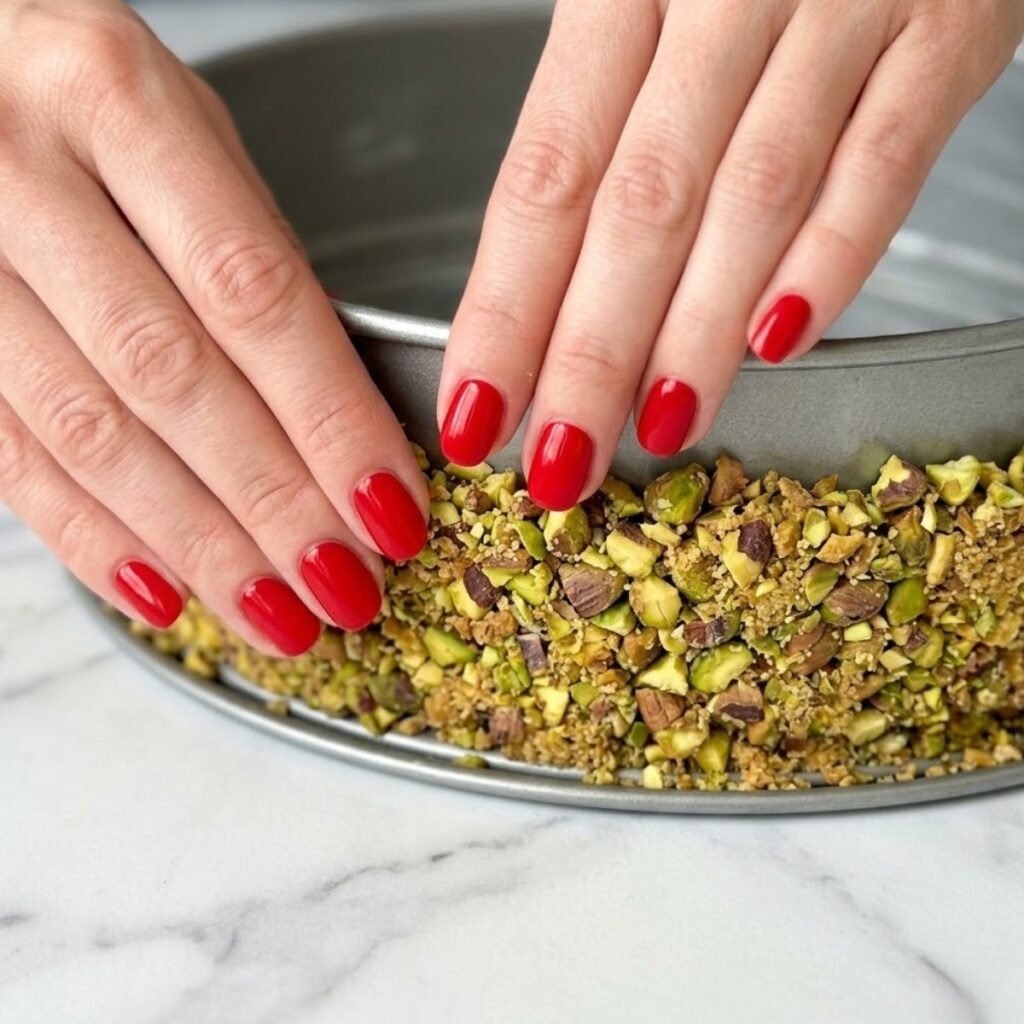
- Press the crust mixture firmly into the base of the prepared springform pan using the flat base of a measuring cup, then continue pressing it up the inside wall of the pan to a height of 3 cm, using your fingertips to pack it against the side so it forms a solid, even border that will hold the filling without crumbling inward; refrigerate the lined pan for 15 minutes while you make the filling.
- Beat the room temperature cream cheese on medium speed for 3 full minutes until completely smooth and completely lump-free before any other ingredient is added; starting with perfectly smooth cream cheese is the single most important factor in avoiding lumps in the finished cheesecake filling.
Step 2: Make the Cream Cheese Filling and Prepare the Raspberry Layer
- Add the granulated sugar and beat for 1 more minute, then add the eggs one at a time on low speed, beating only until each one just disappears into the mixture without over-incorporating air that would cause the filling to crack and puff during baking.
- Add the vanilla extract and sour cream, beat on low speed for 30 seconds until just combined, then stop; the finished filling should look uniformly smooth, slightly thickened, and flow slowly from the spatula rather than running freely.
- Toss the raspberries for the filling layer with the 2 tablespoons of sugar and allow them to sit for 5 minutes until they begin releasing a small amount of juice and the sugar has dissolved into the berry surface; these sugared raspberries will be folded into the bottom of the filling before baking to create the pink band visible in the cross-section of the image.
Step 3: Assemble and Bake the Cheesecake
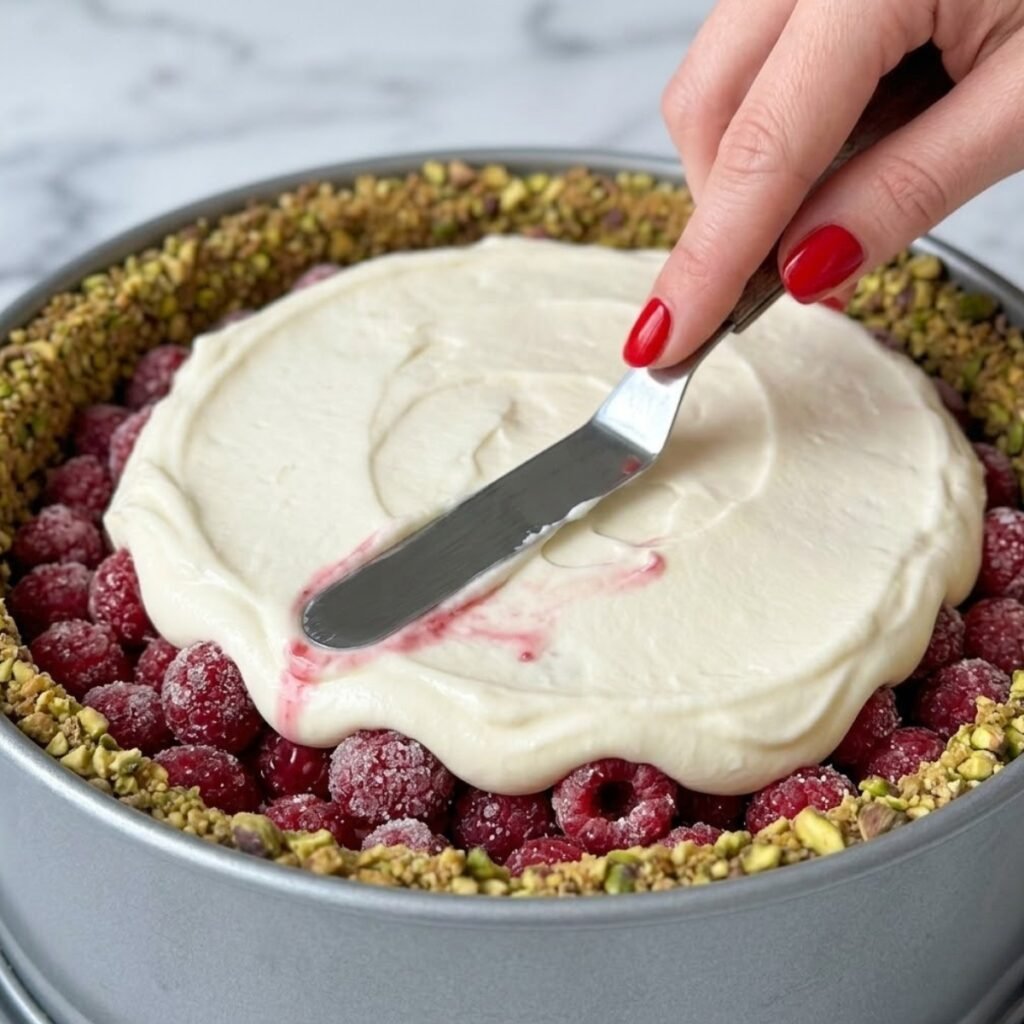
- Pour approximately two thirds of the cream cheese filling into the chilled crust-lined pan and spread it to the edges so the surface is level and the pistachio side crust is fully in contact with the filling at the sides.
- Scatter the sugared raspberries over the surface of the first filling layer in a single layer that covers most of the surface without overlapping heavily, then pour the remaining filling directly over the raspberries and spread it gently to the edges so the berries are sealed between the two layers of filling and will create the pink streak visible between the white filling and the top layer when the cheesecake is cut.
- Set the springform pan on a baking sheet and bake at 325°F for 55 to 65 minutes until the edges look set and the center retains a slight jiggle when the baking sheet is nudged; turn off the oven, crack the door open 2 inches, and allow the cheesecake to cool inside the oven for 45 minutes before removing to prevent the thermal shock that causes the filling to crack.
- Remove from the oven, cool to room temperature on a wire rack, then cover the pan loosely with plastic wrap without pressing it onto the surface and refrigerate overnight; the overnight chill is what produces the clean, firm cross-section visible in the image rather than a soft, slightly runny interior that does not hold its edge when the slice is plated.
Step 4: Make the Raspberry Jelly Topping, Set, and Garnish
- Combine the fresh raspberries, sugar, and lemon juice in a small saucepan over medium heat and stir occasionally until the berries collapse completely and the mixture bubbles actively for 3 to 4 minutes; strain through a fine-mesh sieve into a clean bowl, pressing the pulp firmly to extract all the glossy dark red liquid, and discard the seeds.
- Bloom the powdered gelatin by sprinkling it over the 2 tablespoons of cold water in a small bowl and allowing it to sit undisturbed for 5 minutes until it looks firm and slightly translucent; add the bloomed gelatin to the hot strained raspberry liquid and stir until completely dissolved with no visible granules remaining.
- Allow the raspberry jelly mixture to cool to room temperature until it is thickened to a pourable but not runny consistency, approximately 20 to 25 minutes; if it thickens faster than expected and looks close to setting, rewarm briefly over low heat for 20 seconds and stir until fluid again before pouring.
- Remove the fully chilled cheesecake from the refrigerator, release the springform ring carefully, pour the cooled raspberry jelly over the surface from the center outward so it flows to the edges in an even layer, then refrigerate for 30 minutes until the jelly is fully set and firm to the touch; scatter the chopped pistachios over the set jelly surface, pile the fresh whole raspberries in the center and slightly off-center as shown in the image, and serve immediately or return to the refrigerator uncovered for up to 1 hour before serving.
Pistachio Raspberry Crunch Cheesecake Variations
No-Bake Pistachio Raspberry Crunch Cheesecake
- Replace the baked cream cheese filling with a no-bake version made by beating the cream cheese with powdered sugar and vanilla, then folding in 1 cup of heavy cream whipped to medium-stiff peaks; the result is a mousse-like filling that sets firmly after a full overnight chill and produces the same smooth, pale cross-section visible in the image.
- The no-bake version is slightly lighter in texture than the baked filling and has a more pronounced tang since it does not have the egg structure that baking provides, but it slices cleanly after overnight chilling and holds its edge on the plate just as well as the baked version.
- For the raspberry layer in the no-bake version, fold 3 tablespoons of raspberry coulis (strained raspberry sauce without gelatin) through the bottom third of the filling before it is spread into the crust so the pink streak forms during chilling rather than during baking.
- The baked version holds its shape slightly better at room temperature over an extended serving period, which makes it the better choice for a dessert table where the cheesecake will be out of the refrigerator for more than 30 minutes; the no-bake version is better suited to a dinner where the cheesecake goes directly from the refrigerator to the table.
Raspberry Pistachio Cheesecake With Chocolate Base
- Replace the graham cracker crumbs in the crust with an equal quantity of crushed chocolate Oreo cookies or chocolate wafer crumbs for a darker, more intensely flavored crust that adds a chocolate note to the pistachio without replacing it.
- The chocolate crust turns the visible border on the sides of each slice from the brown and green of the plain crust to a very dark brown and green combination that creates a more dramatic contrast against the pale cream cheese filling in the cross-section.
- Keep the raspberry layer and raspberry jelly topping identical to the base recipe; the chocolate in the crust pairs extremely well with both the raspberry and the pistachio in the same way that a raspberry-chocolate dessert does, with the pistachio providing a savory, nutty bridge between the two stronger flavors.
- This variation is Anna's first choice when we make this for a birthday or a more formal dessert table because the darker crust makes the whole slice look richer and more decadent than the plain version while requiring no additional effort or technique.
Layered Raspberry Cheesecake With Pistachio Cream Filling
- Replace the vanilla extract in the filling with 2 tablespoons of pistachio cream stirred into the cream cheese base before the eggs are added, which infuses the pale filling with a subtle nuttiness that makes the pistachio character present in both the crust and the filling rather than only at the edges.
- The pistachio cream shifts the color of the filling very slightly toward a pale green-ivory that is visible in the cross-section as a faint tint against the bright white of a standard cream cheese filling, which creates a more subtle visual variation that rewards close attention.
- Use the same raspberry layer, same raspberry jelly topping, and same finishing garnish as the base recipe; the only change is the addition of the pistachio cream to the filling, which does not affect baking time, set time, or any other aspect of the recipe.
- This version works especially well for someone who wants every element of the cheesecake to carry the pistachio flavor rather than only the crust, and the pistachio cream can be the same jar used in the Blackberry Pistachio Dream Bars recipe if you have a jar already open.
Substitutions
- Fresh raspberries in the jelly topping can be replaced with frozen raspberries that have been thawed completely and drained of their thawing liquid before cooking down; frozen raspberries release more liquid during thawing and cooking and produce a slightly deeper, more intensely colored jelly that sets at the same rate with the same gelatin quantity.
- Powdered gelatin in the jelly topping can be replaced with 2 sheets of leaf gelatin bloomed in cold water and squeezed dry before being stirred into the hot strained raspberry liquid; leaf gelatin produces a slightly clearer, more brilliant jelly than powdered gelatin and is preferred by professional pastry chefs for exactly this kind of glazed fruit topping.
- Full-fat cream cheese in the filling can be replaced with a combination of 16 oz cream cheese and 8 oz mascarpone for a richer, slightly more buttery filling that holds its edge with even more definition when sliced; reduce the sugar by 2 tablespoons since mascarpone is slightly less tangy than cream cheese and the sweetness balance shifts.
- Graham cracker crumbs in the crust can be replaced with crushed digestive biscuits, vanilla wafers, or speculoos cookies in the same quantity; speculoos adds a warm, spiced caramel note to the crust that pairs very well with both the pistachio and the raspberry and makes the crust taste more complex than the graham cracker version.
Equipment
- 9-inch springform pan
- Food processor for chopping the pistachios
- Hand mixer or stand mixer for the cream cheese filling
- Small saucepan for the raspberry jelly
- Fine-mesh sieve for straining the jelly
- Small bowl for blooming the gelatin
- Offset spatula for spreading the filling and jelly layers
- Wire rack for cooling the baked cheesecake
- Baking sheet for the oven stage
Emma Tip: For the cleanest slices, run a sharp knife under very hot water, dry it quickly, and make a single slow downward cut; wipe the blade after every cut rather than pulling it back through the filling more than once. The jelly layer is the most vulnerable part of the slice to tearing and a warm, clean blade is the only reliable way to cut through it without dragging the surface. Three cuts across the whole cheesecake produces six generous slices that show all four layers clearly from the plate.
Storage Tips
Make Ahead Strategy
- The pistachio crust can be pressed into the pan and refrigerated covered for up to 2 days before the filling is added; this splits the preparation across two days without any quality loss and actually produces a crust that is slightly firmer and better defined at the sides than one made and filled on the same day.
- The full cheesecake without the raspberry jelly topping can be baked, cooled, and refrigerated for up to 2 days before the jelly is made and poured; this allows the baking and the finishing to happen on separate days without affecting the final result.
- The raspberry jelly should always be made and poured on the day before serving so it has a full overnight chill to set completely before the fresh raspberry garnish is added; adding fresh raspberries to warm or soft jelly causes them to sink into the surface and lose their proud, piled appearance.
Refrigeration
- The finished cheesecake with the jelly topping and fresh raspberries keeps in the refrigerator for up to 3 days covered loosely with a tent of plastic wrap that does not touch the fresh berries or the jelly surface; the berries begin to weep juice onto the jelly surface after the second day which dulls the gloss, so for the best visual add the fresh raspberry garnish in the hour before serving.
- Individual slices store well on a covered plate in the refrigerator for up to 3 days; the pistachio crust softens slightly against the filling over time but retains its flavor and enough of its texture to be distinct from the cream cheese layer when eaten.
- Remove the cheesecake from the refrigerator 15 minutes before serving so the filling loses its refrigerator chill and the flavor of the cream cheese and raspberry layers comes forward more fully at a slightly warmer temperature than straight from the cold.
Freezing
- The baked cheesecake without the raspberry jelly topping and without the fresh garnish freezes well wrapped tightly in two layers of plastic wrap and a layer of foil for up to 2 months; thaw overnight in the refrigerator and apply the jelly topping and fresh raspberry garnish fresh on the day of serving.
- Individual slices without topping can be frozen on a parchment-lined tray until solid and then transferred to a sealed freezer bag for up to 2 months; thaw each slice on a plate in the refrigerator overnight and add a spoonful of fresh raspberry jelly and a few fresh raspberries at the moment of serving.
- The pistachio crust loses some of its crunch after freezing and thawing because the butter in the crust absorbs some moisture from the filling during the freeze-thaw cycle; it remains structurally sound and visually intact but the texture of the thawed crust is closer to compressed than genuinely crunchy.
My Grandma's Secret Worth Sharing
Emma's grandmother made a rule about gelatin that I have never found a reason to contradict: always let it cool until it is thicker than you think it needs to be before you pour it over something that is cold. She said people always poured gelatin too early because they were impatient and then watched it run off the sides of whatever they had made and pool on the plate rather than staying where it was intended. When I told Anna this while we waited for the raspberry jelly to cool, Anna stood at the counter watching the bowl with a patience I do not usually associate with her and only said pour when it fell from the spoon in a single thick ribbon rather than a running stream. My grandmother would have considered that a student who had been listening.
FAQs
How do you achieve the crunch element in a Pistachio Raspberry Crunch Cheesecake?
The crunch comes from three things used together: roughly chopped pistachios rather than ground, pressing the crust up the sides of the pan so the crunch is present at every edge of the slice, and keeping the crust cold and firm during baking and chilling so the butter re-solidifies and holds the pistachio pieces in a compressed, crunchy bond. Pulsing the pistachios only 4 to 5 times in the food processor leaves irregular pieces between 3 and 5mm that retain genuine crunch rather than becoming the fine powder that produces a smooth, soft crust with no textural contrast against the filling.
Which is better: baked or no-bake pistachio cheesecake?
Both produce excellent results but they serve different occasions and preferences. The baked version produces a denser, firmer filling with a more custardy set that holds clean edges at room temperature for longer and has a richer, less tangy flavor; it is the better choice for a formal dessert or a table where the cheesecake will be out of the refrigerator for an extended period. The no-bake version produces a lighter, mousse-like filling with a more pronounced tang that tastes fresher and less rich; it is the better choice for a warm weather dessert or a gathering where the cheesecake goes directly from the refrigerator to the table. The cross-section in the image most closely resembles the baked version because of the density and clean edge of the white filling layer.
How should you incorporate the raspberry layer into a cheesecake?
The raspberry layer in this recipe is incorporated by placing sugared raspberries between two layers of filling rather than folding them into the entire batch, which creates the distinct pink band visible in the cross-section of the slice in the image. Folding raspberries into the entire filling turns it uniformly pink rather than creating the layered effect, and adding a separate poured raspberry layer between a chilled first fill and a second fill requires the first fill to partially set before the second is added, which can create a visible seam rather than the soft gradient between the filling and the raspberry layer seen in the image. The between-two-layers method is the most reliable way to get the graduated pink-to-white cross-section visible when the slice is plated.
Four Layers and One Gold Fork
Anna cut the first slice herself and held it on the spatula for a moment before setting it on the dark plate, angling it slightly so the cross-section faced forward the way the image shows. All four layers were visible: the pistachio border, the pale filling, the pink raspberry band, and the dark red glaze with the whole berries piled on top. She set the gold fork alongside it without being asked and stepped back. The table went quiet the way it does when a dessert earns genuine attention before the first bite. If this cheesecake becomes the one your table asks for by name, you might also love our Chocolate Caramel Cheesecake Bites for individual portions that carry the same layered cross-section drama in a single-bite format, our Blackberry Pistachio Dream Bars when you want the pistachio and berry combination in a bar format that serves a larger group from a single pan, or our Greek Yogurt Jello when you want something lighter and fruit-forward that sets in a glass with a fraction of the effort. Make this once for any occasion that deserves a dessert people remember.
Related
Looking for other recipes like Pistachio Raspberry Crunch Cheesecake? Try these:
- Blueberry Lemonade Cupcakes35 Minutes
- Oreo Cheesecake Donut Burger15 Minutes
- Apple Pie Cheesecake Tacos25 Minutes
- Jasmine Peach Vanilla Cake50 Minutes
Pistachio Raspberry Crunch Cheesecake
Ingredients
Equipment
Method
- Preheat oven to 325°F (165°C) and grease a 9-inch springform pan on base and sides; pulse the shelled pistachios in a food processor 4 to 5 times only until roughly chopped into irregular 3-5mm pieces, combine with graham cracker crumbs, sugar, and melted butter, press firmly into the pan base, and continue pressing firmly up the inside wall to a height of 3 cm; refrigerate for 15 minutes.
- Beat the room temperature cream cheese on medium speed for 3 full minutes until completely smooth and lump-free, add the sugar and beat 1 more minute, then add the eggs one at a time on low speed beating only until each just disappears into the mixture; add the vanilla and sour cream and beat on low for 30 seconds until just combined.
- Toss the raspberries for the filling layer with 2 tablespoons of sugar and allow to sit for 5 minutes until they begin releasing juice; pour two thirds of the filling into the chilled crust-lined pan, scatter the sugared raspberries evenly over the surface, then pour the remaining filling directly over the raspberries and spread gently to the edges.
- Set the springform pan on a baking sheet and bake at 325°F for 55 to 65 minutes until the edges look set and the center retains a slight jiggle when nudged; turn off the oven, crack the door open 2 inches, and allow the cheesecake to cool inside the oven for 45 minutes before removing.
- Remove from the oven and cool completely to room temperature on a wire rack, then cover loosely with plastic wrap without pressing it onto the surface and refrigerate overnight or a minimum of 8 hours for a clean, firm cross-section that holds its edge when sliced.
- Combine the raspberries for the jelly, sugar, and lemon juice in a small saucepan over medium heat, stir occasionally until berries collapse and the mixture bubbles for 3 to 4 minutes, then strain through a fine-mesh sieve pressing the pulp firmly; bloom the powdered gelatin in cold water for 5 minutes, stir into the hot strained liquid until completely dissolved, and allow to cool until thickened to a slow ribbon before pouring.
- Release the springform ring carefully from the fully chilled cheesecake, pour the cooled raspberry jelly over the surface from the center outward so it flows to the edges in an even layer, then refrigerate for 30 minutes until the jelly is fully set and firm to the touch.
- Scatter the chopped pistachios evenly over the set jelly surface and around the visible pistachio crust border, pile the fresh whole raspberries in the center and slightly off-center as shown in the image so they look generously stacked rather than placed individually, and serve immediately or refrigerate uncovered for up to 1 hour before slicing with a hot wiped knife.
Leave a Reply